One of the things that greatly impacts users experience is a website’s is perceived performance. One way of getting better perceived performance is by decreasing page load time, this not only helps user experience, but also gives you a better ranking in some search engines such as Google. The plus side is, there are optimisations are quite straight forward to do and only takes a bit of your time, especially if you’re just starting out with a fresh web project.
Browser Cache
Better utilisation of browser caching is one of the most effective and least expensive things that can be done to improve performance.
Before talking about Cache expiry date, let’s see what typically happens when using a modern web browser and web server such as IIS or Apache interact.
The default caching behaviour usually looks like this:
- The browser sends a
GETrequest to the Server - The server responds with 200 Status code, the response would typically contain meta-data in the
HEADsuch asContent-Length,E-TagandLast-Modifiedalong with theBODY, giving browsers the opportunity to cache the content and it’s meta-data - At this point, when you refresh, the browser performs yet another
GETrequest with the same exactURI, but this time with some pre-conditions so that the server can check that the browser’s cache is valid - If the pre-conditions are met, the server simply responds with a
304 status codeie. a simpleHTTP HEADERwith noBODY
So, with this simple, yet clever caching mechanism in mind that all modern browser’s and web server’s use, is it really worth tampering with this default behaviour? Well, it depends. Using a more aggressive caching can eliminate added delay required for the round-trip to and from the server. Google web fundamentals explains browser caching quite extensively, so go read about it to find our more.
Another really interesting read on browser caching is how cloudflare minimises cache miss on GET requests by enforcing ordering of query string keys and values with permanent redirects – although the web applications back-end typically don’t care about this detail, browsers do – as the URI (including query string) is typically used as a look-up for cached content.
Compression
All production ready web servers have gzip available by default for compressing HTTP response. gzip works typically very well for text based files such as most of what we serve in HTTP.
So how much exactly does gzip reduce text files to? – well, it depends, but typically – quite a bit. Check the screenshot below. This was taken from txtwizard.net if you want to see how well gzip does.
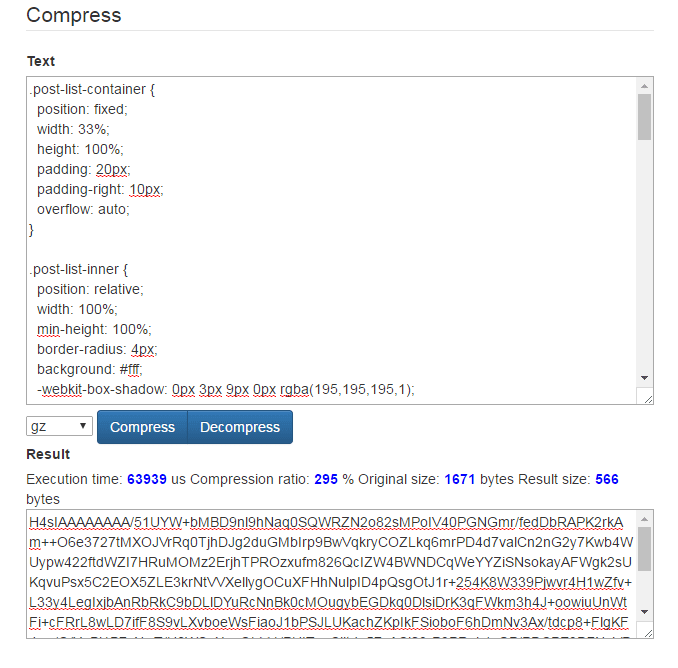
This is a fairly normal looking css compressed from 1.6 kB to 566 bytes
You can probably get slightly better result by minifying all text files, but generally, I think the impact of just gzip gives you such a good result that the extra hassle of working out what’s happening in your obsfucated code in production does not make it worth while, unless you really want to reduce your response length by a few extra bytes.
Here’s the same css file minified and gzipped to demonstrate.
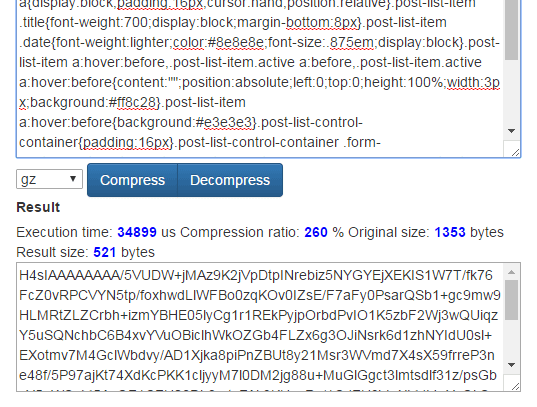
We’ve managed to save another 45 bytes.
Again, Google web fundamental’s write-up on compression is a great guide to this subject and is probably worth your time to read if you want to find out a bit more.
HTTP/2
HTTP/2 enables a more efficient use of network
resources and a reduced perception of latency by introducing header
field compression and allowing multiple concurrent exchanges on the
same connection. It also introduces unsolicited push of
representations from servers to clients.This specification is an alternative to, but does not obsolete, the
HTTP/1.1 message syntax. HTTP’s existing semantics remain unchanged.
HTTP/2 is a young protocol that has only recently introduced. The main thing about HTTP/2 is that it allows for a multiplex connection – where only a single connection is needed to download everything simultaneously – this reduces the expensive opening of ports and handling communication for every single file that needs to be downloaded. This gives a huge performance boost, and also as a bonus, HTTP/2 requires HTTPS giving your users an encrypted connection for extra security at all times, and gives you a slight boost in search engines such as Google.
Browser support is great right now, and most major web servers support HTTP/1.1 fallback for compatibility with older browsers.
You can watch Ilya Grigorik’s talk on HTTP/2 – “Yesterday’s perf best-practices are today’s HTTP/2 anti-patterns” to understand why HTTP/2 is a big deal.
Bundling
Bundling is the process of combining multiple fines into one. There are two main benefits this gives you:
- It reduces number of files that need to be downloaded, so if we ever have to deal with HTTP/1.1, we require less connections, meaning less time opening a connection, doing handshake and all the overhead involved in opening and closing a connection.
- Instead of multiple
Header‘s, we now only need one per bundle, so we’re further reducing file size linearly to the number of file’s bundled.
Most modern web frameworks include some way of bundling JavaScript and CSS files, in ASP.NET MVC 4/5, you can do this during Application Start process.
Here’s the default ASP.NET 4 Bundle configuration:
// in Global.cs
protected void Application_Start()
{
    AreaRegistration.RegisterAllAreas();
    FilterConfig.RegisterGlobalFilters(GlobalFilters.Filters);
    RouteConfig.RegisterRoutes(RouteTable.Routes);
    BundleConfig.RegisterBundles(BundleTable.Bundles);
}

// in BundleConfig.cs
public static void RegisterBundles(BundleCollection bundles)
{
    bundles.Add(new ScriptBundle("~/bundles/jquery").Include(
                "~/Scripts/jquery-{version}.js"));

    bundles.Add(new ScriptBundle("~/bundles/jqueryval").Include(
                "~/Scripts/jquery.validate*"));

    bundles.Add(new ScriptBundle("~/bundles/modernizr").Include(
                "~/Scripts/modernizr-*"));

    bundles.Add(new ScriptBundle("~/bundles/bootstrap").Include(
              "~/Scripts/bootstrap.js",
              "~/Scripts/respond.js"));

    bundles.Add(new StyleBundle("~/Content/css").Include(
              "~/Content/bootstrap.css",
              "~/Content/site.css"));
}
You could also include this in the build instead – this is typically done using node.js or ruby these days. I prefer node.js because of being more familiar with JavaScript.
Doing this via gulp would look something like this:
// gulpfile.js
var gulp = require('gulp');
var babel = require('babelify');
var babel = require('babelify');
var source = require('vinyl-source-stream');
var sourcemaps = require('gulp-sourcemaps');
var buffer = require('vinyl-buffer');

var config = {
  paths: {
    mainjs: './core/client/index.js',
    dist: './dist'
  }
}

function compilejs() {
  var bundler =
      browserify(config.paths.mainjs, {debug: true})
          .transform(babel, {
            presets: ['es2015', 'react', 'stage-1']
          });

  console.log('bundling js...');
  bundler.bundle()
      .on('error', function (err) {
        console.log(err);
        this.emit('end');
      })
      .pipe(source('build.js'))
      .pipe(buffer())
      .pipe(sourcemaps.init({loadMaps: true}))
      .pipe(sourcemaps.write('.'))
      .pipe(gulp.dest(config.paths.dist + '/js'))
}

gulp.task('js', function () {
  compilejs();
});
In this gulp example, we’re assuming that ./core/client/index.js is the main and only entry point that imports all the other scripts using node.js import or ES6 require, we also assume we want a sourcemap with our bundled output. This is a typical bundle setup for a Single Page Application. With this setup, you can either include the command gulp js with our build process or call it manually – we can also improve this by having watcher‘s in place in a separate gulp task that watches for any changes to any of the files we’re concerned with and run the bundling process automatically for us when any changes occur.
Content Delivery Network
CDN is a distributed network that serve content usually located in multiple geographical locations. One of the main benefits of using a CDN for serving content of your website is that it routes your users to the closest server available in the world allowing for lower latency. Another benefit that you get by using a CDN is because your site’s content is no longer served by your own server(s) alone, your website can handle more traffic, making you less prone to DDoS and as an extra bonus, because.
CDN’s typically work very much like a proxy, they cache static content from your website, the CDN then acts as the one serving the users website’s static content. The CDN’s cache usually works very much like how a browser would work, making it’s caching behaviour predictable.
CloudFlare has a great write-up on how their CDN works if you want to find out a bit more.